• Instagram
  • Facebook
  • Twitter

Walla, Walla, WA | 509-529-7537

How to Build a Charcuterie Board Using What We Carry

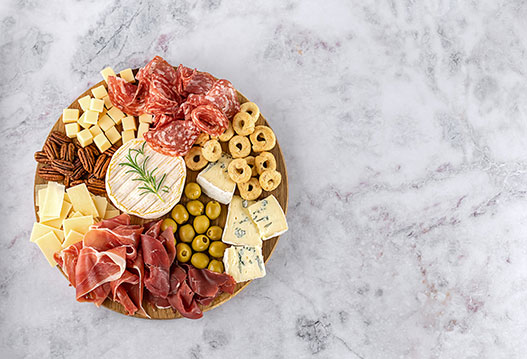
Round wooden charcuterie board with prosciutto, salami, brie, blue cheese, olives, crackers, and pecans on a marble surface

A charcuterie board has become one of those things that looks more complicated than it is. You see elaborate spreads on social media — cascading fruits, sculptural cheese arrangements, color-coordinated everything — and it’s easy to assume there’s a technique involved that takes years to develop.

There isn’t. A great board is really just a collection of things that taste good together, arranged with a little intention. The skill, if you can call it that, is knowing what to put on it. And that starts with understanding what each element is doing.

Here’s how to think about building one, using the kinds of ingredients we carry at D’Olivo.

Start with the Anchors

Every good board has two or three anchors — the things people will return to throughout the evening. Cheese is usually one of them. Something aged and firm, something soft and creamy, and something in between gives you a range that works for different palates. You don’t need six varieties. Three is plenty. We’ve got a great selection of cheeses from Walla Walla Cheese Company to get you started.

Charcuterie in the traditional sense — cured meats — is another anchor. Prosciutto, salami, soppressata, whatever you enjoy. Fold or drape them loosely rather than laying them flat. It sounds fussy but it actually makes them easier to pick up and looks considerably better.

Once your anchors are placed, everything else fills in around them.

Where Balsamic Comes In

This is where a board goes from good to genuinely memorable. A small dish of aged balsamic alongside a wedge of Parmigiano-Reggiano is one of the great simple pleasures in Italian food. The sweetness and acidity of the vinegar does something to aged cheese that’s hard to explain until you try it — it brightens it, cuts through the richness, and makes you want another bite immediately.

A balsamic reduction — made by gently simmering your balsamic until it thickens into a syrup — works beautifully as a drizzle over the whole board or served in a small ramekin for dipping. It also pairs well with fresh fruit. Strawberries, figs, sliced pears — any of these alongside a good dark balsamic makes a combination worth building a board around.
Fig balsamic specifically has an affinity for cheese and charcuterie that’s hard to beat. If you haven’t tried it, a board is one of the best places to start.

Olive Oil as a Dipping Element

A small dish of good extra virgin olive oil with a pinch of flaky salt alongside sliced bread or a baguette is one of the easiest additions to a board and one of the most popular. People gravitate toward it. It gives them something to do while grazing and introduces your olive oil in the most direct way possible — on its own, where the flavor has nowhere to hide.

A flavored oil works well here too. Garlic olive oil with good bread is hard to argue with. A herb-forward oil like Tuscan herb or basil brings something a little more interesting. If you want to offer two options, a robust extra virgin alongside a flavored oil gives people a comparison that’s actually fun to taste through.

Delizia Olives

Olives belong on a charcuterie board. This is not really up for debate. They add brininess, visual contrast, and something savory that rounds out the sweetness from fruit and balsamic. Delizia olives — marinated, flavorful, and far more interesting than the canned variety — are the kind of thing guests comment on. A small bowl tucked into a corner of the board gives people something to pick at between bites of cheese and meat.

Pickled Vegetables

Pickled vegetables serve the same function as olives — acidity and brightness to cut through the richness of cheese and charcuterie — but with a different flavor profile. A small cluster of pickled vegetables adds color and gives the board more range. They’re also the element that tends to surprise people most. Most guests don’t expect them and end up going back for more.

Honey

A small jar or ramekin of good honey is one of the simplest ways to elevate a board. Drizzled over a soft cheese, paired with something salty like prosciutto, or used as a dipping element with bread — honey does a lot of work quietly. The contrast between sweet and salty is part of what makes a board so satisfying to graze on, and honey is one of the most elegant ways to introduce it.

Filling It In

Once your anchors and specialty items are placed, fill the gaps with crackers, sliced bread, fresh fruit, and a few nuts if you like them. The goal is variety in texture and flavor — something crunchy, something soft, something sweet, something salty, something bright. When all of those are present, the board takes care of itself.

Don’t overthink the arrangement. Fill in empty spaces, use small bowls to contain anything liquid or loose, and let things overlap a little. A board that looks abundant and slightly imperfect is more inviting than one that looks like it took two hours to assemble. The best ones usually took twenty minutes.

A Note on Quantity

For a board that’s serving as an appetizer before a meal, plan for about two to three ounces of cheese and two ounces of charcuterie per person. If it’s the main event — a grazing dinner rather than a starter — double that. It’s always better to have slightly more than you need. A board that runs out too quickly is the one thing guests actually notice.

The Bigger Picture

A charcuterie board is one of those things that rewards good ingredients more than almost any other format. Everything is tasted on its own or in simple combinations, which means quality shows immediately and so does the lack of it. A really good olive oil, an aged balsamic worth finishing with, olives that are actually flavorful — these things make a board worth remembering.

The assembly is simple. The ingredients do the work.

Grilling Season: Marinades, Bastes, and Finishing Drizzles

Family grilling burgers outdoors on a sunny day with food and drinks on a picnic table nearby

There’s a version of summer cooking that gets overshadowed by everything else happening outside — the longer days, the company, the cold drinks. But the food deserves attention too. And if you’re still reaching for the same bottled marinade you’ve been using for years, it might be time to try something different.

Olive oil and balsamic vinegar are two of the most useful tools you have at a grill. Not just for salads or dipping bread — for actual outdoor cooking. Marinades, bastes, finishing drizzles, glazes. They do real work here, and the results are the kind of thing people ask about.

Here’s how to use them well.

Why Olive Oil Belongs on the Grill

There’s a persistent myth that you shouldn’t cook with good olive oil because of the heat. It’s worth setting that aside. Extra virgin olive oil is actually one of the more stable cooking oils available, and it handles grill temperatures well. What it brings to grilling specifically is flavor — something neutral oils simply can’t offer.

Brushing protein or vegetables with olive oil before they hit the grate serves a practical purpose too. It prevents sticking, promotes even browning, and gives seasonings something to adhere to. A flavored olive oil — garlic, rosemary, lemon, Tuscan herb — does all of that while also building flavor into the food before it even touches the heat.

Building a Marinade

A good marinade has three components: fat, acid, and flavor. Olive oil is the fat. Balsamic vinegar is the acid. Everything else is flavor.

The ratio matters less than the balance. A simple starting point is three parts olive oil to one part balsamic, with whatever aromatics make sense for what you’re cooking — garlic, fresh herbs, a little dijon, black pepper, a pinch of salt. Combine everything, add your protein or vegetables, and give it time. Thirty minutes is enough for fish. A few hours works well for chicken. Overnight is ideal for tougher cuts of beef or pork.

A few combinations worth trying:

For chicken — lemon olive oil, traditional balsamic, garlic, and fresh thyme. The lemon brightens everything, and the balsamic adds just enough sweetness to encourage good caramelization on the grill.

For vegetables — a robust extra virgin, fig balsamic, a little honey, and fresh rosemary. This works especially well on eggplant, zucchini, and bell peppers. The fig balsamic turns jammy when it hits the heat.

For steak — garlic olive oil, aged dark balsamic, cracked black pepper, and a small amount of dijon. Let it sit overnight if you can. The acidity from the balsamic tenderizes the meat and the garlic oil carries the flavor all the way through.

Basting While You Cook

Basting is often skipped because it feels like extra work. It isn’t, really, and it makes a meaningful difference. Brushing meat or vegetables with a mixture of olive oil and balsamic every few minutes as they cook builds up layers of flavor and helps develop a glaze on the outside that you can’t get any other way.

Keep a small bowl nearby with your basting mixture and a pastry brush. A good ratio to work with is equal parts olive oil and balsamic, thinned slightly if needed with a little stock or water. Apply it with a light hand — you want a coating, not a drench.

For fish, baste only in the last few minutes of cooking. It’s more delicate than meat and can overpower quickly.

The Finishing Drizzle

This is the step that most people skip and shouldn’t. A finishing drizzle is applied after the food comes off the grill, not during cooking. The heat is gone, the flavors have settled, and a small amount of good oil or aged balsamic over the top adds a brightness and freshness that no amount of cooking can replicate.

A drizzle of good extra virgin over grilled chicken just before it goes to the table. A few drops of aged balsamic over sliced steak. A swirl of lemon olive oil over grilled vegetables. These are small gestures that make a real difference in how the finished dish tastes.

The key here is quality. A finishing drizzle is not a place for something mediocre. When the oil or vinegar is the last thing to hit the food, it’s also the first thing you taste.

A Few Things Worth Knowing

Don’t use your best aged balsamic in a marinade — heat diminishes the complexity you’re paying for. Save it for finishing. A younger, thinner balsamic is better suited to high-heat applications where it has room to cook down and concentrate.

Pat proteins dry before they go on the grill, even after marinating. Excess liquid on the surface steams instead of sears, which works against the browning you’re after. A paper towel and thirty seconds is all it takes.

Let meat rest after it comes off the heat. A few minutes makes a real difference in how the juices redistribute, and it also gives you time to apply that finishing drizzle before it hits the table.

Summer Cooking at Its Best

The best outdoor meals aren’t complicated. They’re built on good ingredients, a little technique, and the willingness to pay attention to the details. A really good olive oil and a balsamic worth finishing with go a long way toward making that happen.

The grill does most of the work. You just have to give it something worth cooking.

The Best Mother’s Day Gifts for the Cook in Your Life

Happy Mother's Day card with a mimosa and fresh flowers on a sunny outdoor brunch table

Mother’s Day gift guides tend to look the same. Candles, robes, brunch reservations. All fine things, but not especially personal — and not particularly useful after the day is over.

If the person you’re shopping for actually loves to cook, or wants to, there’s a better approach. The best gifts for a cook are the ones that change how they work in the kitchen. Things they use every day, reach for without thinking, and would genuinely miss if they were gone.

Here’s what’s worth considering this year.

A Knife That Actually Works

A good kitchen knife is one of those things most people don’t buy for themselves, even when they should. They make do with what they have — a knife that came in a set years ago, something that does the job but not much more — until someone gives them a reason to upgrade.

Wusthof knives have been made in Solingen, Germany since 1814. They’re precise, well-balanced, and built to last for decades with basic care. For someone who cooks regularly, a quality chef’s knife is the kind of gift that gets used every single day. It changes the whole experience of being in the kitchen — prep is faster, cuts are cleaner, and the work just feels better.
If you’re not sure where to start, an 8-inch chef’s knife is the right call for most people. It’s the one knife that handles nearly everything.

Le Creuset: The Kind of Thing People Keep Forever

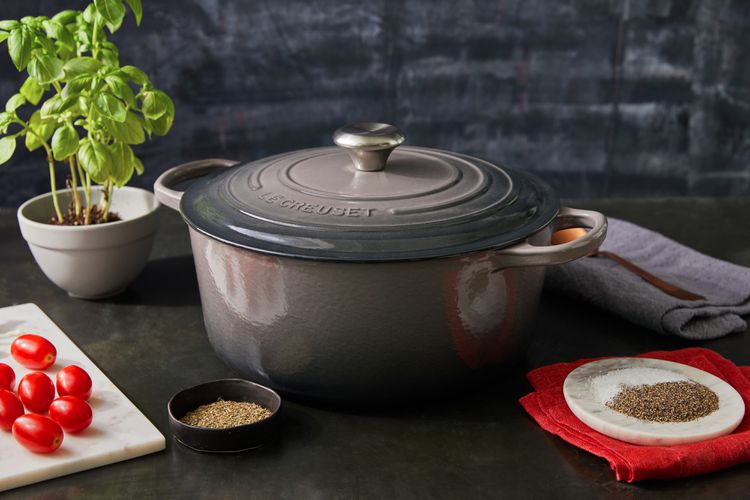
There’s a reason Le Creuset pieces get passed down. The enameled cast iron distributes heat evenly, holds temperature beautifully, and works on every cooking surface — stovetop, oven, induction. A Dutch oven, a braiser, a skillet — these aren’t just pretty objects. They’re workhorses that make soups, stews, braises, and breads genuinely better.

The color is part of it too. Le Creuset’s lineup includes some really beautiful options right now, and there’s something to be said for cookware that looks as good on the table as it does on the stove. If you’re looking for something that will be used and appreciated for years, this is a strong choice.

Not sure which piece to choose? A 5.5 or 6.75-quart round Dutch oven is the most versatile starting point. It does almost everything.

USA Pans for the Baker

If she bakes, USA Pans are worth knowing about. Made in the United States from heavy-gauge aluminized steel with a nonstick coating, they heat evenly and release cleanly — the two things that matter most in a baking pan. No warping, no hot spots, no wrestling with stuck loaves.

Loaf pans, sheet pans, muffin tins, cake pans — the whole lineup is built to last. For someone who bakes regularly and has been fighting with flimsy pans, this is a practical gift that will get used every week.

Club D’Olivo: Something That Arrives All Year

A Club D’Olivo membership is a different kind of gift — one that keeps showing up. Members receive quarterly shipments of olive oils and balsamic vinegars, with the option to choose their own flavors or let us put together a selection. Each shipment also includes a special gift, hand-picked by Roni.

For someone who loves to cook, it’s an opportunity to try flavors they might not pick up on their own and keep their pantry stocked with something genuinely good. For someone who is just getting into olive oil and balsamic, it’s a gentle, enjoyable introduction that arrives four times a year.

It’s also the kind of gift that’s easy to give from a distance. We ship.

Specialty Foods Worth Gifting

Sometimes the right gift is smaller and more specific. A bottle of aged balsamic they wouldn’t splurge on themselves. A finishing salt or a specialty spice blend. A tin of loose-leaf tea. A jar of good honey.

These things don’t take up space in the kitchen, but they change what comes out of it. A good balsamic over strawberries or roasted vegetables turns something simple into something worth talking about. A quality finishing salt at the table does the same. Small things, real difference.

A gift basket built around a few of these — a bottle of olive oil, a balsamic, a salt, something sweet — makes a considered, personal present that’s easy to put together and genuinely useful.

The Thinking Behind All of This

The best gifts for someone who cooks are things that respect how seriously they take it. A great knife says you understand that the right tool matters. A Le Creuset piece says you know she’ll use it for years. A Club membership says you want her to keep discovering new things.

None of these are last-minute purchases, which is kind of the point. Taking a little time to think about what she actually needs — and what would genuinely make her time in the

What Is True Balsamic Vinegar — and Why Does It Matter?

Stainless steel balsamic vinegar tasting containers and bottled olive oils displayed on wooden shelves at D'Olivo Tasting Bar in Walla Walla

Walk into any grocery store and you’ll find a dozen bottles labeled “balsamic vinegar.” Some cost three dollars. Some cost thirty. They look similar enough on the shelf, and if you’ve only ever used the inexpensive kind, you might reasonably wonder what the fuss is about.

The fuss is legitimate. What most people know as balsamic vinegar and what true balsamic vinegar actually is are two pretty different things — and understanding the difference changes the way you cook with it.

Where It Comes From

Real balsamic vinegar comes from one place: the Emilia-Romagna region of Italy, specifically the provinces of Modena and Reggio Emilia. It’s been made there for over a thousand years. The name itself — aceto balsamico — comes from the Italian word for balm, which tells you something about how it was originally regarded. This wasn’t a condiment. It was a luxury, given as gifts, passed down through families, used sparingly and with intention.

The production method hasn’t changed much. It starts with freshly pressed grape must — the whole crushed grape, juice and all — which is cooked down slowly over an open flame until it reduces significantly. What you’re left with is thick, sweet, and deeply concentrated. That’s the starting point, not the finished product.

The Barrels

What happens next is what separates traditional balsamic from everything else. The cooked must is transferred into a series of wooden barrels, each made from a different wood — oak, chestnut, cherry, juniper, and mulberry are common. The vinegar spends years moving through this sequence, a small amount transferred from one barrel to the next as it evaporates and concentrates further.

The minimum aging time for traditionally produced balsamic is twelve years. Some is aged for twenty-five years or more. During that time, it absorbs character from each wood, developing a complexity that no shortcut can replicate.

When it’s ready, it’s thick enough to coat a spoon. Sweet, but with real acidity underneath. Layered in a way that’s hard to describe but immediately recognizable when you taste it.

What’s in Most Bottles

Commercial balsamic vinegar — the kind that dominates most grocery store shelves — is made differently. Wine vinegar is the base, with grape must added for color and sweetness, sometimes thickened with caramel or gum. It can be produced in a matter of weeks. It’s not a bad product for what it is, but it’s a fundamentally different thing from traditionally aged balsamic, which is why the price gap exists.

The European Union recognizes this distinction formally. Aceto Balsamico Tradizionale di Modena and Aceto Balsamico Tradizionale di Reggio Emilia carry protected designation of origin status — the same kind of certification that governs Champagne or Parmigiano-Reggiano. Producers must follow strict standards and submit their vinegar for tasting panels before it can be bottled and sold under that designation.

There’s also a middle category — Balsamic Vinegar of Modena IGP — which uses some aged vinegar blended with wine vinegar and must. These can be quite good, especially when they indicate a longer aging period on the label. The quality varies considerably, and the label is worth reading.

How to Use It

Traditional aged balsamic isn’t meant to be cooked. The heat dulls the complexity you’re paying for. It’s a finishing ingredient — a few drops over a finished dish right before it hits the table.

A good aged balsamic over fresh strawberries is one of the simplest and best things you can eat. Same over a piece of Parmigiano-Reggiano, or on roasted vegetables just off the sheet pan, or drizzled across a bowl of vanilla ice cream. It also does something remarkable with grilled meat — the sweetness and acidity cut through fat in a way that makes the whole dish taste more alive.

The younger, thinner styles are better suited to dressings and marinades, where they get a chance to meld with other ingredients. A basic vinaigrette — good olive oil, balsamic, a little dijon, salt — is one of those recipes you make once and never go back to bottled dressing again.

The Tasting Part

If you’ve never tasted a traditionally aged balsamic on its own, it’s worth doing. Pour a small amount into a spoon and taste it straight. The sweetness hits first, then something more complex — fruit, wood, a gentle acidity that lingers without being sharp. It doesn’t taste like vinegar the way you might expect. It tastes like something that took a long time to become what it is.

That’s the whole story, really. Great balsamic is the product of time, patience, and a process that resists shortcuts. Once you understand that, the bottle at the back of your pantry — the one you reach for without thinking — starts to look a little different.

A Romantic Dinner at Home: Cooking for Two with Olive Oil and Balsamic

Colorful conversation heart candies scattered on a white surface for Valentine's Day

A Romantic Dinner at Home: Cooking for Two with Olive Oil and Balsamic

There’s a version of Valentine’s Day that involves a reservation you made six weeks ago, a prix fixe menu, and a table near the bathroom. And then there’s the version where you cook at home, open something you actually like to drink, and take your time.

Cooking for two has its own kind of romance. The kitchen smells good. There’s no rush between courses. And when a dish comes together well — really well — it’s a small, private kind of triumph.

You don’t need a complicated recipe to pull this off. You need a handful of good ingredients, a little intention, and honestly, a great olive oil and balsamic vinegar go further here than almost anything else.

Why These Two Ingredients Do the Heavy Lifting

A drizzle of aged balsamic over the right dish is the kind of thing that makes people ask what you did differently. It adds sweetness, depth, and acidity all at once — without any extra prep. A really good extra virgin olive oil does something similar: it finishes a dish the way salt does, rounding everything out and adding richness you can’t quite name but definitely notice.

Together, they give you a lot of flexibility. You can build a multi-course dinner that feels considered and intentional without spending the whole day in the kitchen.

A Menu Worth Making

Here are three courses that work well together and won’t overwhelm you on a weeknight.

To Start: Warm Olives and Bread

This is barely a recipe, which is the point. Pour a generous amount of good olive oil into a small skillet. Add a few sprigs of fresh rosemary, a couple of smashed garlic cloves, a pinch of red pepper flakes. Warm everything over low heat for about five minutes — you’re not frying anything, just coaxing the oil into something fragrant and herb-forward. Add a handful of olives in the last minute or two.

Serve in the pan with crusty bread alongside. It’s warm, it smells incredible, and it gives you something to do while the rest of dinner comes together.

The Main: Seared Chicken with Balsamic Pan Sauce

This one sounds more impressive than it is to make.

What you need:

– 2 boneless chicken breasts or thighs
– Olive oil
– Salt and pepper
– 1 shallot, thinly sliced
– 1/2 cup of chicken stock
– 3 Tbsp of aged balsamic vinegar
– 1 Tbsp of butter

Season the chicken well on both sides. Heat olive oil in a skillet over medium-high and sear the chicken until golden — about four to five minutes per side depending on thickness. Remove and set aside.

In the same pan, cook the shallot for a couple of minutes until softened. Add the stock, scraping up any bits from the bottom of the pan. Let it reduce by half, then add the balsamic. Stir and let it thicken slightly. Pull the pan off the heat and swirl in the butter.

Slice the chicken and spoon the sauce over it. Serve with roasted vegetables or simple mashed potatoes. The sauce is rich and a little sweet with a good hit of acidity — the kind of thing that makes a weeknight dinner feel like something special.

To Finish: Strawberries with Balsamic and Black Pepper

This is one of those combinations that sounds unexpected until you try it, and then you wonder why you ever ate strawberries any other way.

Slice a cup of fresh strawberries. Drizzle with about a tablespoon of aged balsamic — a dark, traditional style works best here — and crack a small amount of black pepper over the top. Let them sit for ten minutes or so. The balsamic draws out the juice from the berries and the whole thing becomes syrupy and deeply flavored.

Serve over vanilla ice cream, with whipped cream, or just on their own in a nice bowl. It takes about three minutes to put together and tastes like you thought about it.

A Few Things Worth Knowing

The quality of the balsamic matters more in a dessert application than almost anywhere else. When it’s the star of the dish rather than a supporting player, you want one that’s aged and genuinely complex — slightly sweet, a little thick, with some real flavor behind it. The kind that’s been reduced and concentrated over time, not just colored and flavored vinegar.

Same goes for the olive oil in that warm olive starter. A good extra virgin, something peppery and fresh, makes that dish. A bland oil just makes it oily.

This is actually part of what makes cooking at home for someone you like a worthwhile thing to do. You’re not just following a recipe — you’re paying attention to what goes into it.

The Actual Point

Romantic dinners don’t require a lot of components. They require care. And when your ingredients are doing their job well, the cooking gets simpler, not harder.

A warm kitchen, something good simmering on the stove, someone to eat with. It doesn’t take much more than that.

Simple Recipes for Busy Weeknights

Because dinner should be delicious, not draining.

We’ve all been there. It’s 6:42 PM. You’re home, you’re tired, and the last thing you want is a complicated dinner with a sink full of dishes to follow. But you still want something fresh, flavorful, and satisfying, not another takeout box.
That’s where olive oil comes in, not just as a cooking fat, but as a flavor-forward tool that can transform even the simplest meals into something worth slowing down for.

At D’Olivo, we believe the secret to weeknight success is having a few great ingredients always on hand. And a high-quality extra virgin olive oil (EVOO), especially one infused with bold flavors, is at the top of that list.

Here’s a roundup of easy, no-fuss recipes that start with a drizzle and end with clean plates.

Recipes To Try

1. Garlic Olive Oil Pasta (15 minutes)

This dish is proof that you don’t need a heavy sauce to make pasta shine. Just fresh ingredients, a little technique, and really good oil.

What you need:

Spaghetti or linguine
D’Olivo Garlic Olive Oil
Crushed red pepper flakes
Fresh parsley
Salt & parmesan

How to make it:

Boil your pasta. While it cooks, heat a generous drizzle of garlic olive oil in a pan with red pepper flakes. Toss in the drained pasta, add chopped parsley and salt, and give it a good mix. Finish with freshly grated parmesan and an extra drizzle of oil.

It’s comforting, quick, and deeply flavorful, no jarred sauce needed.

2. Lemon Roasted Vegetables (30 minutes, hands-off)

The easiest way to eat more veggies? Roast them in something that actually makes them craveable.

What you need:

Your favorite chopped veggies (carrots, broccoli, sweet potatoes, etc.)
D’Olivo Lemon Olive Oil
Salt, pepper, garlic powder

How to make it:

Toss the veggies in lemon olive oil, season well, and roast at 425°F until caramelized and golden. The lemon oil adds brightness that makes this more than just another veggie side, it becomes the main attraction.

Serve over quinoa, toss into pasta, or pair with any protein.

3. Herb-Infused Chicken Thighs (20 minutes)

Weeknight chicken doesn’t have to be boring. It just needs the right oil.

What you need:

Boneless chicken thighs
D’Olivo Tuscan Herb Olive Oil
Salt, black pepper, paprika

How to make it:

Rub the chicken with Tuscan Herb Olive Oil, season generously, and sear in a hot pan for 4–5 minutes per side until golden. That herbaceous base builds flavor fast, without marinating or multiple seasonings.

Serve with roasted potatoes or a simple salad, and don’t forget the finishing drizzle.

4. Balsamic Glazed Flatbreads (10-minute dinner hack)

Think pizza night… but faster, fresher, and lighter.

What you need:

Store-bought flatbreads or naan
D’Olivo Traditional Balsamic
Mozzarella, cherry tomatoes, arugula
D’Olivo Basil Olive Oil

How to make it:

Top the flatbreads with sliced mozzarella and tomatoes. Toast in the oven or air fryer until the cheese is melty. Add fresh arugula, a drizzle of basil olive oil, and finish with a swirl of balsamic.

It’s quick, it’s pretty, and it tastes like something from a café menu.

5. One-Pan Shrimp with Mango Balsamic (15 minutes)

When you’re craving something different, fast.

What you need:

Raw shrimp (peeled & deveined)
D’Olivo Mango Balsamic
Olive oil, garlic, lime juice
Chopped cilantro (optional)

How to make it:

Sauté shrimp in olive oil with garlic until just pink. Add a splash of Mango Balsamic and a squeeze of lime. The pan glaze comes together in seconds, coating the shrimp in sweet, tangy goodness.

Serve over rice or lettuce cups for a light but flavorful dinner.

Why Olive Oil Changes Everything

These recipes don’t rely on long prep times or fancy equipment. They rely on freshness, flavor, and flexibility, all things high-quality olive oil delivers.

When your olive oil tastes good on its own, it can replace a dozen ingredients. There’s no need for bottled dressings, no need for complicated marinades, no need for sauces full of sugar or fillers.

The right drizzle adds richness, depth, and balance, instantly.

Flavored oils, like those at D’Olivo, go even further. Garlic, lemon, basil, mushroom a nd sage, these infusions give you a head-start flavor before your pan even heats up.

Make Dinner Less of a Decision

The worst part of weeknight cooking isn’t the cooking. It’s decision fatigue. What to make. What you’re missing. Whether it’ll even turn out.

But when you have a few staple oils, a couple go-to vinegars, and a simple rotation of recipes, suddenly dinner becomes something to look forward to.

And if all else fails? Toast. Olive oil. Sea salt. Maybe an egg. It’s not a compromise. It’s a classic.

You don’t need a culinary degree or a free evening to make something delicious. You just need the right ingredients, starting with a bottle of olive oil you trust.

At D’Olivo, our oils are cold-pressed, full of flavor, and crafted to work as hard as you do on a weeknight. Simple dinners deserve better ingredients, and so do you.

Explore our collection and make every drizzle count.

Why Premium EVOO Is Worth the Price

Let’s be honest — most of us have stood in the grocery store, staring at a $30 bottle of olive oil next to a $7 one, and thought, “There’s no way the difference is that big.” I get it. But once you understand what actually goes into producing a genuinely great Extra Virgin Olive Oil, that price gap starts to make a lot more sense.

It Starts With Picking Olives at the Wrong Time (On Purpose)

Here’s something that surprised me when I first learned about olive oil production: it takes somewhere around 8 to 11 kilos of olives to get a single litre of quality oil. That’s a *lot* of olives. And premium producers make it even harder on themselves by harvesting early — late September, early October in Spain — when the olives are still green and underripe.

Why would anyone do that? Because that’s when the flavour is at its peak. You get that fresh, grassy, almost peppery bite that people who know olive oil go crazy for. The trade-off is brutal, though. Green olives give up way less oil than ripe ones, which drives the cost up considerably.

Compare that to the stuff lining most supermarket shelves. Those oils typically come from olives picked in December or January, when they’re overripe and have lost most of the flavour complexity and health compounds that made them worth pressing in the first place. You’re essentially paying less for a diminished product.

The Mill Matters More Than You’d Think

Getting the olives off the tree is only half the battle. The milling process is where things get technical — and expensive.

To legally earn the “Extra Virgin” label, the oil has to be cold-pressed below 27°C. Running the press hotter would squeeze out more oil and cut costs, but it wrecks the flavour and strips out the nutrients. So premium producers eat that loss.

Then there’s the cleanliness factor. Even a small amount of residue from a previous batch sitting in the machinery can contaminate the new oil. The people running serious mills are borderline obsessive about this, and they need to be. It’s year-round work that demands skilled operators who actually care about the end product.

Can You Actually Cook With It? (Yes. Stop Worrying.)

This one drives me nuts. Somewhere along the way, the idea took hold that you shouldn’t cook with EVOO because of its smoke point. It sounds reasonable on the surface, but the research doesn’t back it up.

Smoke point, it turns out, is a pretty lousy predictor of how an oil actually performs under heat. What matters more is the oil’s polyunsaturated fat content (lower is better) and its antioxidant levels (higher is better). Premium EVOO checks both boxes. It’s unrefined, loaded with natural antioxidants, and has been shown in controlled testing to be the most stable cooking oil you can use at home — pan-frying, deep-frying, baking, all of it.

One study heated various oils to 180°C for six hours straight. EVOO produced the fewest harmful polar compounds of any oil tested, beating out canola, grapeseed, and the rest. So no, you’re not “wasting” good olive oil by cooking with it. You’re actually making the smartest choice.

The Health Angle Is Real, Not Just Marketing

Premium EVOO is packed with polyphenols, Vitamin E, and squalene — compounds that fight oxidative stress and inflammation throughout your body. This isn’t fringe wellness stuff. The research on olive oil and health is deep and well-established.

Regular consumption supports cardiovascular health by pushing LDL cholesterol down and HDL up. There’s growing evidence it may help protect cognitive function as we age, with some studies pointing toward reduced Alzheimer’s risk. A tablespoon on an empty stomach can stimulate bile production and support digestion. And the monounsaturated fats help with blood sugar regulation and insulin sensitivity.

None of these benefits come free, though. They’re tied directly to the polyphenol and antioxidant content — exactly the compounds that get sacrificed when producers cut corners on harvest timing or milling temperature.

It Does More Than You’d Expect

This is where things get fun. Bartenders have started using premium EVOO in cocktails — fat-washing spirits with it or shaking it into drinks like a Mango Jalapeño Margarita to add body and a silky texture. It sounds strange until you try it.

On the beauty side, the monounsaturated fats can penetrate the hair shaft to smooth out frizz, and it works surprisingly well as a gentle makeup remover. The antioxidants you’re consuming also support skin hydration and collagen protection from the inside. Not bad for a pantry staple.

So Is It Worth It?

Look, nobody can produce a genuinely premium, early-harvest olive oil cheaply. The math just doesn’t work. Lower yields, higher labour costs, expensive equipment, skilled operators — it all adds up. If you’re looking to stretch your dollar, buying in larger formats (2L or 5L containers) from a reputable producer is the move.

But yes, it’s worth it. You’re paying for something that tastes better, cooks safer, and actively supports your health in ways that cheaper alternatives simply cannot. That $30 bottle starts looking like a bargain once you understand what’s inside it.

Bread and Beyond: Creative Uses for Sourdough Starter

Here’s what nobody tells you when you start a sourdough starter: the bread is almost beside the point.

Yes, a good sourdough loaf is worth the effort. That crackling crust, the open crumb, the tang that commercial bread can’t replicate. But once you’ve got an active starter going, you’ll realize pretty quickly that you’re producing more of this stuff than any reasonable bread-baking schedule can handle. You feed it, it grows, you use some, you feed it again. The math doesn’t work unless you’re baking every single day or throwing half of it away each time.

The discard problem is real. And the solution isn’t to toss it—it’s to start thinking of your sourdough starter as an ingredient, not just a bread-making tool.

The Breakfast Situation

Sourdough pancakes might be the best argument for keeping a starter alive. The discard you’d normally throw out makes pancakes that are lighter, tangier, and more interesting than anything from a box mix. The fermentation does some of the work overnight, developing flavor and air bubbles while you sleep.

Overnight Sourdough Pancakes

(Makes about 12 pancakes)

The night before:

1 cup sourdough discard
1 cup all-purpose flour
1 cup milk
1 tablespoon sugar

Whisk everything together in a large bowl. Cover loosely and leave on the counter overnight (8-12 hours). In the morning, add:

1 egg
2 tablespoons melted butter
½ teaspoon salt
1 teaspoon baking soda

Stir until just combined—don’t overmix. The batter will be bubbly and slightly thick. Cook on a buttered griddle over medium heat until bubbles form on the surface and the edges look set, then flip. Serve immediately.
The baking soda reacts with the acidic starter, which is what gives these pancakes their lift. Don’t let the batter sit too long after adding it or you’ll lose some of that rise.

The same approach works for waffles—just increase the butter to 4 tablespoons for crispier edges.

Beyond Breakfast

Pizza dough is where sourdough starter really shines. The long, slow fermentation develops flavor that quick-rise doughs can’t match.

Sourdough Pizza Dough

. (Makes two 12-inch pizzas)

100g active sourdough starter (fed within the last 4-12 hours)
325g water, room temperature
500g bread flour (all-purpose works, but bread flour gives better chew)
10g salt
1g instant yeast (optional, but adds insurance)

Combine starter and water, stirring to dissolve. Add flour and mix until no dry spots remain. Let rest 30 minutes. Add salt (and yeast if using), then knead or fold until smooth, about 5-7 minutes by hand.

Divide into two balls. Place in lightly oiled containers and refrigerate for 24-72 hours. The longer it sits, the more flavor develops.

To bake: Remove from fridge 2 hours before you want to make pizza. Preheat your oven as hot as it goes (500-550°F) with a baking stone or inverted sheet pan inside. Stretch the dough gently—don’t use a rolling pin—and top sparingly. Bake until the crust is blistered and the cheese is bubbling, about 7-10 minutes depending on your oven.

Sourdough Discard Flatbread

(Makes 4 flatbreads)

This one comes together fast and works alongside almost any meal.

1 cup sourdough discard
½ cup plain yogurt (full-fat works best)
1 teaspoon baking powder
½ teaspoon salt
1 cup all-purpose flour, plus more for dusting

Mix discard, yogurt, baking powder, and salt. Add flour and stir until a shaggy dough forms. Turn out onto a floured surface and knead briefly—just until it comes together, about 1 minute.

Divide into 4 pieces. Roll each piece thin, about ⅛ inch. Cook in a dry cast iron skillet over medium-high heat until charred spots appear, about 2 minutes per side. Brush with melted butter or olive oil while warm.

These are best fresh but will keep wrapped in a towel for a few hours.

The Sleeper Hit: Sourdough Crackers

Thin, crispy, and completely customizable. They keep for a week and make you look like you have your life together.
Everything Sourdough Crackers

1 cup sourdough discard
2 tablespoons olive oil
½ teaspoon salt
2 tablespoons everything bagel seasoning (or make your own: sesame seeds, poppy seeds, dried garlic, dried onion, flaky salt)

Preheat oven to 350°F. Line a baking sheet with parchment.

Mix discard, olive oil, and salt until smooth. Spread very thin on the parchment—use an offset spatula or the back of a spoon. You want it nearly translucent in spots. Sprinkle seasoning evenly over the top and press gently so it adheres.

Bake 25-35 minutes, rotating halfway, until golden and crisp throughout. The edges will darken first; that’s fine. Let cool completely on the pan—they crisp up more as they cool.

Break into irregular shards. Store in an airtight container.

Variations: rosemary and flaky salt, cracked black pepper and parmesan, or za’atar with a drizzle of good olive oil after baking.

The Sweet Side

Sourdough’s tang plays well with sugar. It adds depth the way a pinch of salt does in baking—not something you taste directly, but something you’d miss if it weren’t there.

Sourdough Cinnamon Rolls

(Makes 12 rolls)

For the dough:

100g active sourdough starter
180g whole milk, warmed slightly
50g sugar
1 egg
400g all-purpose flour
6g salt
85g softened butter

For the filling:

6 tablespoons softened butter
¾ cup brown sugar
2 tablespoons cinnamon

For the glaze:

4 oz cream cheese, softened
1 cup powdered sugar
2-3 tablespoons milk
½ teaspoon vanilla

Combine starter, milk, sugar, and egg. Add flour and salt, mix until a shaggy dough forms. Add softened butter a tablespoon at a time, kneading until fully incorporated and the dough is smooth and slightly tacky. This takes about 10 minutes by hand.
Cover and let rise at room temperature until doubled, 4-8 hours depending on your kitchen temperature. (Or refrigerate overnight and let it finish rising in the morning.)

Roll dough into a rectangle, roughly 18×12 inches. Spread with softened butter, then sprinkle evenly with brown sugar and cinnamon. Roll tightly from the long side. Cut into 12 pieces with a sharp knife or unflavored dental floss.
Place in a buttered 9×13 baking dish. Cover and let rise until puffy, another 1-2 hours.

Bake at 375°F for 25-30 minutes, until golden on top. While warm, spread with cream cheese glaze (just beat all glaze ingredients together until smooth).

These take time. They’re a weekend project. But the texture—soft, rich, with actual pull and chew instead of doughy sweetness—is worth the effort.

Keeping Your Starter Happy

All of this depends on having a healthy, active starter. And that’s where most people run into trouble.

Temperature matters more than most beginners realize. A starter kept at 70°F behaves differently than one at 78°F. Too cold and it’s sluggish, slow to rise, slow to develop flavor. Too warm and it peaks too fast, becomes overly acidic, and starts to smell like nail polish remover. The sweet spot is somewhere in the mid-70s, but finding that consistency in a normal kitchen—where temps swing with the seasons and the thermostat—is genuinely hard.

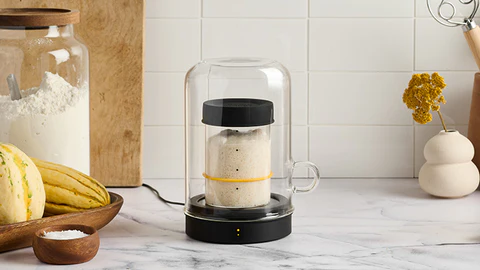
The Goldie by Sourhouse solves this problem simply. It’s a temperature-controlled container for your starter. Set your target temperature and it holds there, regardless of what’s happening in the rest of your kitchen. Winter, when your house drops to 65°F overnight? Your starter stays at 76°F. Summer heat wave? Same thing.

The result is a predictable starter. It rises on schedule. It peaks when you expect it to. You can actually plan to bake, rather than waiting to see if conditions align. If you’ve been fighting an inconsistent starter—or you’ve let one die because the maintenance felt like guesswork—The Goldie is worth a look.

The Bigger Picture

Keeping a sourdough starter is a small commitment that pays off in ways you don’t expect. Yes, you can make bread. But you can also make pancakes on a Tuesday, pizza on Friday, crackers for the weekend, and cinnamon rolls when you feel like impressing someone.

The discard isn’t waste—it’s possibility. Once you see it that way, the whole practice makes more sense.A healthy starter and a little creativity go a long way.

The Minimalist Kitchen: 10 Tools You Truly Need

Walk into any kitchen store (or scroll through any cooking blog), and you’ll be bombarded with gadgets promising to revolutionize your cooking life. Spiralizers, avocado slicers, egg separators, specialized pans for every occasion – the list is endless and overwhelming. But here’s the truth: great cooking doesn’t require a cluttered kitchen drawer full of single-use tools. It requires a carefully curated collection of quality pieces that can handle multiple tasks with excellence.

Whether you’re setting up your first kitchen, downsizing to a smaller space, or simply craving a more streamlined cooking experience, these ten essential tools will equip you to handle virtually any recipe that comes your way. The key is choosing quality over quantity – pieces that feel good in your hand, perform reliably, and last for years.

What’s On The List

1. One Excellent Chef’s Knife (8-inch)

If you could only own one kitchen tool, this would be it. A quality 8-inch chef’s knife – something like a Wusthof Classic – handles about 90% of your cutting tasks. It minces garlic, dices onions, breaks down a chicken, slices tomatoes, and chops herbs. Forget the knife block with twelve pieces you’ll never use. Invest in one stellar chef’s knife, learn to use it properly, and keep it sharp. Your cooking will improve immediately, and your drawer space will thank you.

2. A Paring Knife

While your chef’s knife is the workhorse, a 3-4 inch paring knife handles the delicate work. Hulling strawberries, deveining shrimp, peeling apples, or any task requiring precision and control – that’s where a paring knife shines. Choose one that feels comfortable in your hand since you’ll be using it for detailed, close work.

3. Cast Iron Skillet (10 or 12-inch)

This might be the most versatile piece in your kitchen. A well-seasoned cast iron skillet sears steaks beautifully, bakes cornbread, roasts vegetables, fries eggs, and goes from stovetop to oven without hesitation. It’s naturally non-stick when properly maintained, nearly indestructible, and actually improves with age. Whether you choose traditional bare cast iron or enameled, this is the pan that can do almost everything.

4. Dutch Oven (5-7 quart)

If the cast iron skillet handles quick cooking, the Dutch oven masters slow, patient preparations. Soups, stews, braises, bread baking, pasta dishes – a quality Dutch oven like Le Creuset handles them all. The heavy lid traps moisture for tender results, and the even heat distribution means nothing burns on the bottom. It’s equally at home on the stovetop or in the oven, and it’s beautiful enough to go straight to the table.

We recommend choosing from any of the Le Creuset cookware available. The quality and craftsmanship are unmatched.

5. Rimmed Baking Sheet

The humble sheet pan is criminally underrated. Yes, it bakes cookies, but it also roasts vegetables, bakes fish, toasts nuts, makes sheet pan dinners, and catches drips from pies in the oven. Choose a heavy-duty option like USA Pan – the rimmed edges contain juices and prevent warping, while the quality construction ensures even browning. If you had to pick just one size, go with a half-sheet (18×13 inches).

6. Wooden Cutting Board

You need a stable, spacious surface for all that chopping. A quality wooden cutting board is gentle on knife edges, naturally antimicrobial, and can be restored with mineral oil when it starts looking tired. Choose one large enough to give you working room – at least 12×18 inches. Bonus: it doubles as a serving board for cheese and charcuterie.

7. Wooden Spoon and Silicone Spatula

Technically two tools, but they work as a team. A wooden spoon is your go-to for stirring soups, sauces, and sautés – it won’t scratch your cookware or conduct heat up the handle. A heat-resistant silicone spatula scrapes bowls clean, folds delicate batters, and flips eggs without damaging non-stick surfaces. Between these two, you can handle virtually any stirring, scraping, or folding task.

8. Stainless Steel Saucepan (2-3 quart)

For boiling grains, heating sauces, making oatmeal, or warming soup, a medium saucepan with a lid is essential. Stainless steel is durable, non-reactive with acidic foods, and heats evenly. Choose one with a comfortable handle and a lid that fits securely.

9. Large Mixing Bowl

You need somewhere to toss salads, marinate meat, mix dough, and prep ingredients. A single large stainless steel or ceramic mixing bowl (at least 4-5 quarts) handles most tasks. Stainless steel is lightweight, durable, and can double as a double boiler when placed over simmering water.

10. Box Grater

Fresh-grated cheese tastes incomparably better than pre-shredded, and a box grater also handles zesting citrus, shredding vegetables, and grating ginger or garlic. Choose a sturdy four-sided grater that won’t tip over mid-use. This simple tool adds fresh flavor to countless dishes and takes up minimal space.

The Philosophy Behind Minimalism

Notice what’s not on this list: no electric gadgets, no single-use tools, no specialized pans. That’s intentional. These ten items work together to create a kitchen that’s efficient, uncluttered, and capable of producing restaurant-quality meals.
The minimalist approach isn’t about deprivation – it’s about intentionality. When you’re not digging through cluttered drawers looking for that one tool, cooking becomes more enjoyable. When every item in your kitchen is something you genuinely use and appreciate, you’re more likely to cook from scratch.

Quality Over Quantity

Here’s where the minimalist philosophy really pays dividends: because you’re buying fewer items, you can afford to invest in quality. That Wusthof knife will last decades with proper care. Your Le Creuset Dutch oven might outlive you. Quality tools perform better, feel better in your hands, and ultimately save money by not needing replacement.

Start with these ten essentials, use them regularly, and only add new tools when you’ve identified a genuine, repeated need that your current collection can’t address. You might be surprised to discover that the answer to better cooking isn’t more stuff – it’s better stuff, used skillfully.

Your minimalist kitchen isn’t about sacrifice. It’s about clarity, quality, and the freedom that comes from having exactly what you need and nothing you don’t.

The Bottle Color Question: Clear vs. Dark Glass Explained

When it comes to olive oil, what’s inside the bottle gets all the attention; the aroma, the flavor, the origin, the pressing date. But there’s another detail that quietly determines how long that quality lasts: the color of the bottle itself. Clear or dark? Transparent or tinted? It may seem like a design choice, but the glass you pour from is more than packaging. It’s a barrier; or sometimes, a gateway; between your oil and its biggest enemies: light, heat, and air.

Why Bottle Color Matters

To understand why the bottle matters, it helps to remember that olive oil is not an inert product. It’s alive with natural compounds; antioxidants, chlorophyll, and polyphenols; that give it flavor and health benefits but also make it sensitive to its environment. As soon as the oil leaves the press, it begins a slow process of transformation. The goal of proper storage and packaging is to slow that process as much as possible. The color and opacity of the glass play a crucial role in this preservation.

The Appeal and Drawback of Clear Glass

Clear glass bottles, with their clean and transparent look, are visually appealing. They allow customers to admire the oil’s golden or green hues and convey a sense of purity and freshness. In retail settings, this transparency can make a product more enticing; especially when the oil glows under bright store lights. However, the same visibility that enhances presentation also exposes the oil to ultraviolet (UV) rays and visible light, both of which accelerate oxidation. Light energy interacts with chlorophyll in the oil, producing free radicals that begin breaking down the delicate fatty acids and aromatic compounds. Within weeks of exposure, this process can dull the flavor, flatten the aroma, and reduce the oil’s antioxidant content.

How Dark Glass Protects Your Oil

Dark glass; typically green, brown, or amber; serves as a protective filter. It blocks most UV radiation and significantly reduces the amount of visible light that penetrates the bottle. This protection helps the oil retain its original qualities for a longer period. Studies have shown that oils stored in dark glass remain stable for months longer than those kept in clear bottles under identical conditions. The difference becomes even more pronounced when the bottles are displayed under direct lighting or stored in a sunny kitchen. In such settings, the degradation of oil in clear bottles can be several times faster.

The Science Behind Light Protection

The scientific explanation is simple but powerful. Oxidation, the process that leads to rancidity, requires three main accelerants: oxygen, heat, and light. While air and temperature can be controlled by sealing the bottle properly and storing it in a cool place, light exposure is determined primarily by the color and thickness of the glass. Darker bottles, particularly those in deep green or amber tones, absorb or deflect light before it reaches the oil. Clear glass, by contrast, allows full-spectrum light to pass through, effectively acting like a magnifying glass that intensifies degradation when the oil is displayed on open shelves or near windows.

For this reason, most high-quality olive oil producers choose dark glass bottles or opaque metal tins. These options not only preserve freshness but also signal to informed consumers that the brand prioritizes quality over shelf appeal. Some producers who prefer clear glass for aesthetic reasons compensate by packaging their bottles in protective boxes or wrapping them in foil, allowing buyers to enjoy the beauty of the oil at home without exposing it to excessive light during transport or display.

Not All Dark Glass Is Equal

It’s worth noting that not all dark glass offers equal protection. The effectiveness depends on both color and density. Amber glass filters out more light than green glass, while black or very dark brown provides near-total protection. However, extremely opaque bottles can make it difficult for customers to gauge how much oil remains, which is why most manufacturers choose deep green as a balance between practicality and preservation.

The Retail Environment Factor

Another factor often overlooked is the lighting environment of where the oil is stored or sold. In a dimly lit pantry or wine cellar, the risk from light exposure is minimal, even with clear glass. But in grocery stores, where oils often sit under strong fluorescent or LED lighting for months, clear bottles can experience rapid quality decline. Many oils that appear fresh on the shelf may already have lost much of their flavor by the time they reach the kitchen, simply because their packaging couldn’t defend against continuous illumination.

The D’Olivo Difference

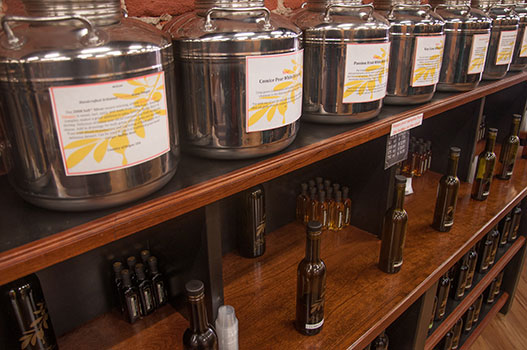
At D’Olivo we understand the importance of keeping oils as fresh as possible and because of this we store our oils in large, stainless steal fustis. When it’s time, oils are the bottled into dark green bottles and sealed in-store. This ensures that our customers are getting the freshest oils, bottled properly and ready to be used in the kitchen.

Transparency vs. Protection

The debate between clear and dark glass also touches on consumer psychology. Transparency suggests honesty; the idea that nothing is hidden, that what you see is what you get. For new or boutique brands, this visual openness can attract customers. Yet, ironically, the very transparency meant to showcase authenticity can end up damaging the product’s integrity. Premium producers increasingly educate buyers on this paradox, explaining that dark glass doesn’t conceal the oil; it protects it. True transparency, in this case, lies in the brand’s willingness to preserve quality rather than merely display beauty.

Environmental and Innovation Considerations

From an environmental standpoint, both clear and dark glass are recyclable, but darker shades tend to be reused more effectively in the olive oil industry because they’re standard for preserving freshness. Some modern brands are experimenting with UV-coated clear glass that maintains visibility while blocking harmful wavelengths, merging design with science. However, these coatings add cost and are still less protective than fully tinted glass. As the industry evolves, packaging innovation continues to explore how to combine sustainability, aesthetics, and functionality; but for now, darker glass remains the gold standard for oil longevity.

What This Means for Consumers

For consumers, the takeaway is straightforward but often overlooked. The bottle color is not a trivial detail; it’s a signal of how seriously the producer takes preservation. If you buy oil in a clear bottle, treat it as you would fresh produce: use it quickly, store it in a dark cabinet, and avoid leaving it on the counter. For dark glass bottles, the rules still apply; keep them cool, sealed, and away from sunlight; but you’ll have a longer window to enjoy the oil at its peak.

The Final Word

Ultimately, the question of clear versus dark glass isn’t just about preference or branding; it’s about chemistry. Light is energy, and energy changes everything it touches. In the world of olive oil, those changes can mean the difference between vibrant, aromatic notes and a dull, lifeless taste. A dark bottle guards against that transformation, preserving the subtleties that define true extra virgin quality; the fruitiness, the slight bitterness, the peppery finish.
So the next time you reach for a bottle of olive oil, take a closer look at its color. Behind that simple shade of green or amber lies a world of science and craftsmanship, all aimed at ensuring that what you pour over your food is as fresh, flavorful, and healthful as the day it was made. The glass, after all, is not just packaging; it’s protection.